HTML & CSS: Advanced CSS1 and CSS2 Selectors
So we've learnt quite a lot about styling things in CSS and by this point you should even be able to create a basic website using divisions and CSS. The issue is that with your current selector knowledge, some things are quite literally impossible to do. In this tutorial we are going to go over some advanced selectors in CSS1 and CSS2. We may cover a tiny bit of CSS3 ground, but we're going to try to save most of the CSS3 stuff for a later tutorial. Expect this tutorial to be a bit linear and all over the place, but you should be able to accomplish things that you couldn't before using some of the techniques outlined in this tutorial.
Class and ID selectors
So we can already target individual classes and IDs in CSS using #IDName and .className, but at current we can't target a particular element that has a particular class. Say if we wanted to target specifically h2s that had the class "large" and nothing else for example. Luckily for us there is a CSS selector that can do this! You can simply type the element you want to do the specific target on (in our case h2) followed by the class or ID name (immediately, with no space). So if we wanted to target any h2s on the page that have the class "large", we could use the selector h2.large.
Make sure you don't confuse this with h2 .large (notice the space), as with the space it targets any element with the class "large" inside of h2s (we've talked about these before and referred to them as nested selectors).
The same thing can be accomplished with IDs using something like h2#large, although since there should only be one instance of an ID on a page it doesn't really make much sense to use it in most cases.
Pseudo-classes
We've gone over pseudo-classes briefly before - they're selectors that have a colon preceding them. The most common pseudo-class is probably :hover, which we've used previously with links to detect their hover state. There are however a bunch more pseudo-classes which are useful in different situations. Let's list some of them with some brief explanations (if in doubt - try using some of them!):
:hover- When an element (especially a link) has the mouse cursor "floating" over it - example usage:a:hover:visited- When a link has been visited before - example usage:a:visited:active- When a link is being pressed down - example usage:a:active:focus- When a link or input element is in focus (usually done via the tab key on the keyboard) - example usage:input:focus:target- When a certain ID is being targeted (e.g. http://www.example.com/#IDName) - example usage:#IDName:target:enabled- When an input element is in the enabled (default) state - example usage:input:enabled:disabled- When an input element is disabled - - example usage:input:disabled:checked- When a radio button or checkbox is checked - example usage:input:checked:indeterminate- When no radio buttons out of a group are selected - example usage:input:indeterminate
The above outline some of the most common pseudo-classes, however there are also another group of "pseudo-classes", which act a little bit differently. There are a few of these in CSS2 (and even more in CSS3) and they are called pseudo elements. These are elements that don't actually appear in the HTML of the page, but we can create and style using CSS. We'll learn about the two most common (and arguably most important) CSS2 pseudo elements, :before and :after, in a few tutorials time - but for now, some are listed below:
:first-child- Selects the first element of its type within a parent - example usage:ul li:first-child(would select the firstliin everyul):last-child- Selects the last element of its type within a parent - example usage:ul li:last-child(would select the lastliin everyul):first-letter- Selects the first letter of text in the element - example usage:p:first-letter(would select the first letter in every paragraph):first-line- Selects the first line of text in the element - example usage:p:first-line(would select the first line in every paragraph)
Since I've put examples next to every one, there isn't much else I can say here apart from that these are really useful and powerful. Don't believe me? Try using them yourself (and even combining them with other advanced selectors) and see what you can make. On a sidenote, it's worth noting that you can chain the majority of pseudo-classes - something like ul li:first-child:first-letter should work fine.
Child Selector
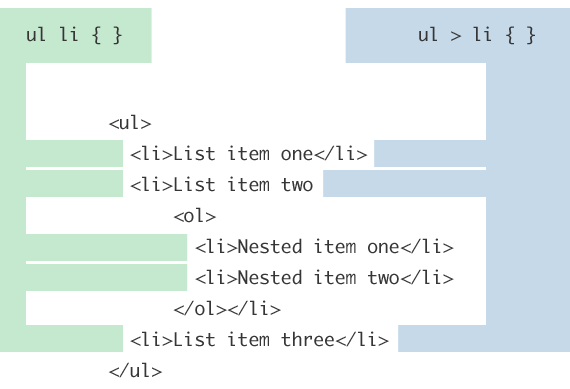
While we've previously been talking about an element's "children" being anything inside it, it is not strictly speaking true. If an element is inside an element that is inside the parent, that element isn't actually a child of the original parent, it's simply a descendent. Doing a simple nested selector such as ul li will actually select all li descendants from ul. Should you want to select just the direct descendants (the immediate children), what can you do about it? Well luckily there is a selector that does this! It's simply represented with a closing angle bracket, so if you want to select only the direct li children of uls - you could use the ul > li selector.
This can become especially useful for styling a structure where you want direct children and deeper children to have different styles. Chris Coyier created an awesome diagram demonstrating the concept, which is shown below:
Adjacent Sibling Selector
Another useful selector is the adjacent sibling selector. Quite simply, it does what it says on the tin - it selects the element immediately next to an element. It is expressed using the + symbol to separate the two parts (what you are detecting things adjacent to, and what you're searching for). So if we wanted to select all uls that directly follow h1s, we could use the h1 + ul selector.
Attribute Selectors
One very useful selector introduced in CSS2 is the attribute selector. It can select elements with certain attributes! It's extremely useful and can be used in a bunch of places (we'll actually be creating a little something using it in the not-too-far future). The most basic usage is simply testing if an element has some sort of attribute set. A nice idea might be testing if links (a elements) have the href attribute set. The links themselves can be targeted normally with something as simple as a, and then the attribute check can be done using square brackets and specifying the attribute name inside. So if we wanted to apply styling to links which have an href attribute set, we could use the a[href] selector.
Checking if attributes match specific values can also be accomplished by using different comparison operators. The operators are as follows:
=- A certain value is exactly equal to the attribute.*=- [CSS3] A certain value is within the attribute somewhere.^=- [CSS3] A certain value is at the start of the attribute$=- [CSS3] A certain value is at the end of the attribute~=- A certain value is within a space-seperated list (in the attribute).|=- A certain value is within a dash-seperated list (in the attribute).
1 2 3 | |
It's worth noting that you can actually check multiple attributes in one selector if you so wish by hugging them up against eachother, so something like input[name][type="radio"] would work fine as a selector (in this example it would select every input element with the name attribute set, and a type or radio).
Wildcards (and the universal selector)
The final selector we are going to cover in this tutorial is the wildcard. This is illustrated with an asterisk (*) and essentially can match any element on the page. This is useful in a variety of places. When used on its own, it is often called the "universal selector" as it selects everything - sometimes you'll see people setting the margin on everything in their page to 0 using * { margin: 0; }. The wildcard can also be used to create some advanced selectors. If you wanted to select any child element of a div for example, you could use a selector along the lines of div *.